1) Plan Your Login Experience
Before you jump into the builder, clarify the essentials:
- Audience: Members, clients, staff, or students?
- Goal: Quick sign-in, upsell, or info hub?
- Location: /login URL, menu link, or button in the header.
- Access Rules: Who Sees What After Login? (membership/role logic)
A simple plan keeps your page lightweight and on-brand.
2) Create the Login Page (Divi Builder)

- Pages → Add New in WordPress, name it Login (or “Sign In”).
- Click Use Divi Builder → Build From Scratch.
- Insert a Regular Section with a One-Column Row.
- Add the Login module (search “Login”). This module displays username/password fields and a “Remember Me” checkbox.
Tip: If you prefer a more modular layout, you can place the Login module inside a card-style column with background, shadow, and rounded corners.
3) Style the Login Module to Match Your Brand
Open the module’s Design tab and customize:
- Text: Choose brand fonts, sizes, and line-height for labels, inputs, and button text.
- Button: Enable “Use Custom Styles for Button” and set padding, border radius, and hover states.
- Fields: Add subtle borders or a soft background; increase field height for improved tap targets on mobile devices.
- Card: Give the column a white background, 24–32px padding, 16–24px radius, and a soft shadow for depth.
- Spacing: Add a generous margin-top to vertically center the card on larger screens.
Microcopy: Under the Content tab, add a concise welcome message, a password reset link, and a small-print support note.
4) Add a Branded Layout Around the Form
Use Divi’s structure to elevate the experience:
- Hero Area: Two-column row — left for a headline and brief value statement (“Welcome back, let’s get you in.”), right for an illustration or logo.
- Trust Signals: A small row below with client logos or “Secure login • 256-bit TLS” note.
- Helpful Links: Below the form, add links to ‘Create Account’ (if allowed), ‘Forgot Password’, and ‘Support’.
Keep the visual hierarchy clear so the Login button remains the primary CTA.
5) Redirect Users After Login (Optional)
Depending on your site, you may want to send users to a dashboard or a specific page.
Option A — Divi Login Module settings:
- In the Login module’s Content → Redirect toggle, enable Redirect To The Current Page or paste a Custom Redirect URL (e.g., /dashboard/).
Option B — Per-role redirects (code snippet):
If you need different destinations per role, add a small snippet in a child theme or code snippets plugin:
add_filter('login_redirect', function($redirect_to, $request, $user){

if (isset($user->roles) && is_array($user->roles)){

if (in_array('customer', $user->roles)) return home_url('/account/');

if (in_array('subscriber', $user->roles)) return home_url('/members/');

if (in_array('editor', $user->roles)) return admin_url();

}

return $redirect_to; // default

}, 10, 3);
6) Map /login to Your Custom Page
For a friendly URL:
- Publish your page at /login (Settings → Permalinks must be enabled).
- Update any old menu or button links to your new login page.
- If you previously linked to /wp-login.php, replace it sitewide with /login.
Note: Users can still reach /wp-login.php it unless you use a security plugin to rename/obscure it (see Section 10).
7) Create a Global Login Header/Footer (Theme Builder)
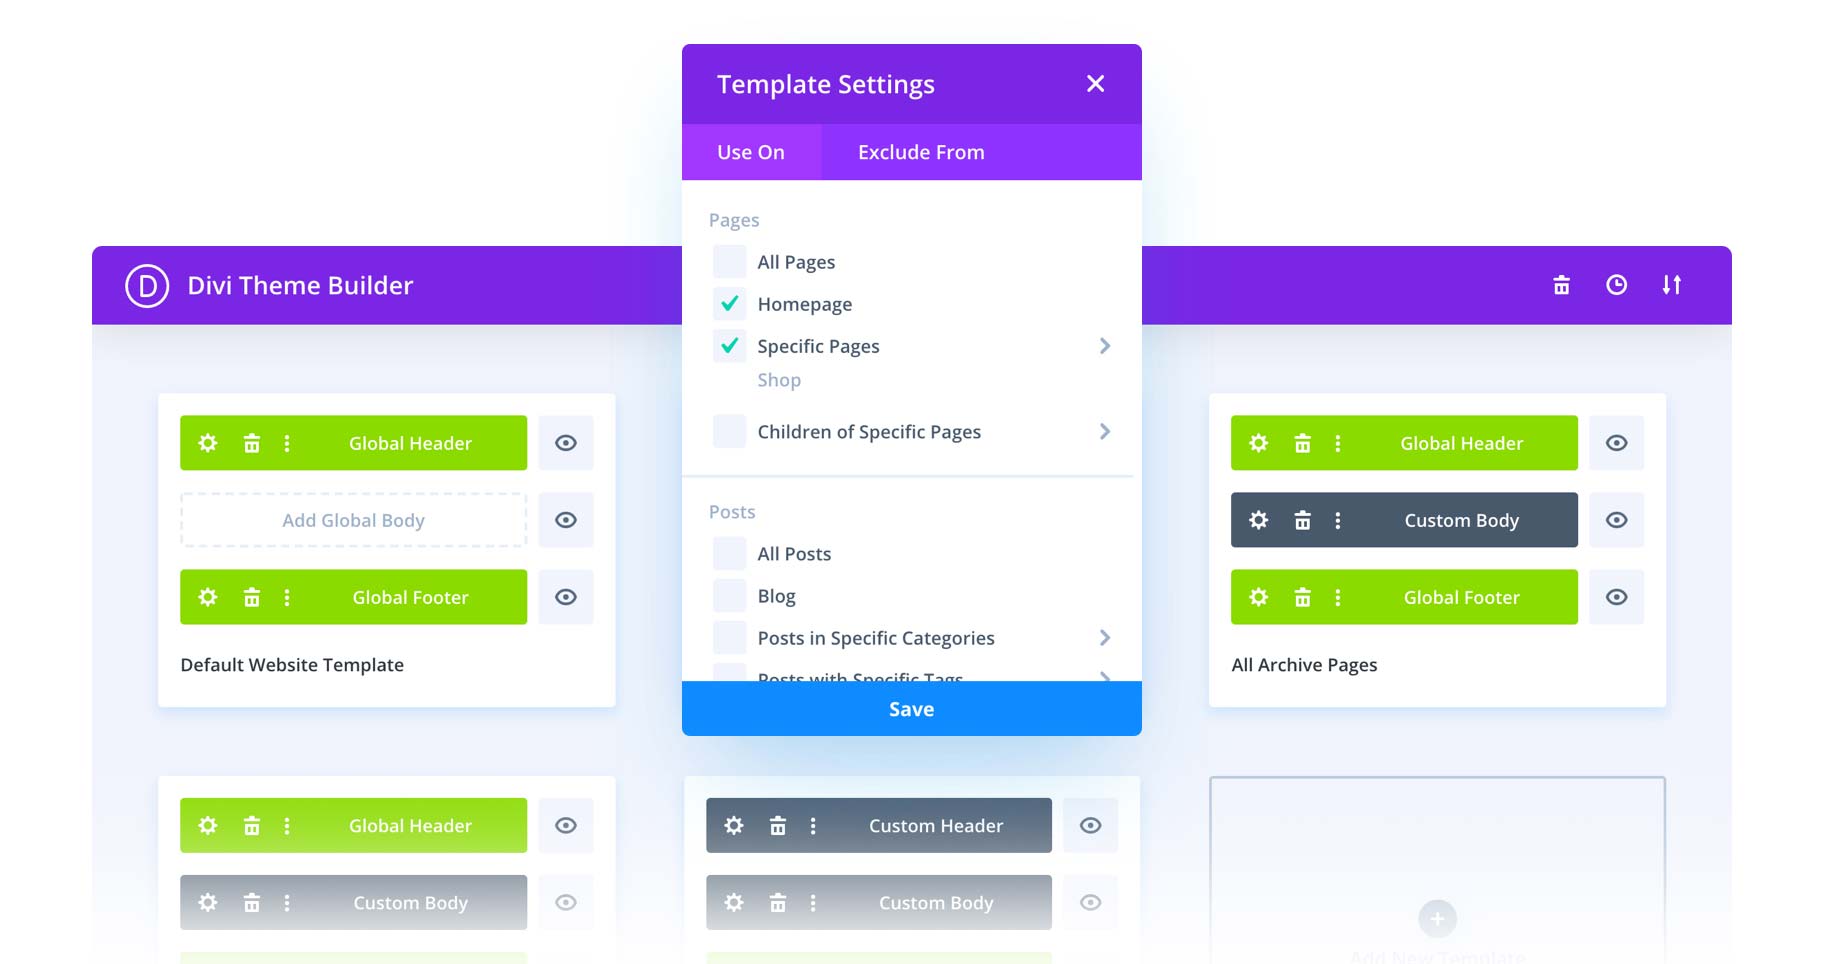
If you want a minimal, distraction-free layout on the login page:
- Go to Divi → Theme Builder.
- Add a New Template and assign it to Specific Pages → Login.
- Build a custom Header with only your logo and a Back to Home link.
- Build a minimal Footer with privacy, terms, and support links.
This keeps users focused while preserving brand cohesion.
8) Improve UX with Helpful States and Feedback
- Inline messages: Write friendly success/error copy (e.g., “Oops, that password didn’t match. Try again or reset it.”).
- Loading cues: Add subtle button hover and pressed states.
- Autofocus: Ensure the username field is focused on page load for quick typing.
- Password visibility toggle: Using a plugin that adds this feature reduces typos on mobile.
9) Add Social Login (Optional)
If your product benefits from frictionless sign-in, integrate reputable plugins for Google/Apple/Microsoft login. Style the buttons to match your Divi palette and position them below or beside the standard fields to avoid confusion.
10) Strengthen Security
A beautiful login must be secure:
- HTTPS: Ensure a valid SSL certificate is in place across the site.
- reCAPTCHA / hCaptcha: Many security plugins let you add a captcha to the login form.
- Limit login attempts: Throttle brute-force attempts.
- Change login URL: Use a security plugin to customize or hide
/wp-login.php. - 2FA: Offer Two-Factor Authentication for high-privilege roles.
Pro tip: Avoid showing detailed error reasons (e.g., “Unknown username”) to reduce enumeration risk.
11) Make It Mobile-First
In the Login module and row settings:
- Adjust font sizes and field heights for small screens.
- Increase button padding and tap targets.
- Stack columns and center-align content.
Use Divi’s responsive toggles (phone/tablet/desktop) to fine-tune per device.
12) Test, Measure, Iterate
Before launch, test flows:
- Wrong password → reset → email link → success
- New user → account creation (if applicable) → first login
- Role-based redirects
- Accessibility: keyboard navigation, focus outline, sufficient contrast
After launch, monitor:
- Login errors over time
- Page speed and Core Web Vitals
- Support tickets related to sign-in friction
Iterate on copy and layout to reduce friction and improve completion rate.
13) Optional CSS Enhancements
For a refined feel, add small CSS tweaks in Page Settings → Advanced → Custom CSS or Theme Options:
/* Softer field focus */

.et_pb_login .input:focus { outline: none; box-shadow: 0003pxrgba(52,152,219,.25); }

/* Button micro-interaction */

.et_pb_login .et_pb_button:hover { transform: translateY(-1px); }

/* Card polish */

.login-card { background:#fff; padding:2rem; border-radius:18px; box-shadow:010px30pxrgba(0,0,0,.06); }
Apply the login-card class to the column or module wrapper.
14) Bonus: Add a Logged-In State Message
If a user navigates to the login page while already authenticated, show a friendly message with shortcuts:
- “You’re already signed in.”
- Buttons for Dashboard, Account, and Log out.
You can achieve this with conditional content modules or shortcodes that checkis_user_logged_in().
15) Free Download: Divi Child Theme Custom Login Template
To help you get started faster, we’ve created a free Divi Child Theme with a pre-designed custom login page. You can download and install it directly into your WordPress setup and tweak it to match your brand.
👉 Download Free Divi Child Theme Login Template
This child theme includes:
- A styled login module card with a responsive design
- Branded header and footer placeholders
- Custom CSS for modern hover and focus states
- Ready-to-use redirect options
Use this as a foundation and customize it for your specific audience.
Conclusion
With Divi’s Login Module and Theme Builder, you can transform the default WordPress login into a branded, secure, and user-friendly gateway. Keep the page focused, fast, and accessible, guide users to the right destination after sign-in, and protect the form with best-practice security. Your members (and support team) will thank you.